本篇文章是在 CentOS9系统上安装高可用Kubernetes1.35集群
节点资源配置如下:
主机名
ip
内存
核心
操作系统
master01
192.168.213.41
4g
2
centos9
master02
192.168.213.42
4g
2
centos9
master03
192.168.213.43
4g
2
centos9
worker01
192.168.213.44
10g
4
centos9
worker02
192.168.213.45
10g
4
centos9
高可用vip:192.168.213.40
此篇文章高可用方案为nginx+keepalived,当然其他方案诸如haproxy+keepalived也是可行的,这里不做介绍
tee /etc/yum.repos.d/centos.repo > /dev/null << 'EOF'
[baseos]
name=CentOS Stream $releasever - BaseOS - mirrors.aliyun.com
baseurl=https://mirrors.aliyun.com/centos-stream/9-stream/BaseOS/x86_64/os/
gpgcheck=1
gpgkey=file:///etc/pki/rpm-gpg/RPM-GPG-KEY-centosofficial
enabled=1
[baseos-debuginfo]
name=CentOS Stream $releasever - BaseOS Debuginfo - mirrors.aliyun.com
baseurl=https://mirrors.aliyun.com/centos-stream/9-stream/BaseOS/x86_64/debug/tree/
gpgcheck=1
gpgkey=file:///etc/pki/rpm-gpg/RPM-GPG-KEY-centosofficial
enabled=0
[baseos-source]
name=CentOS Stream $releasever - BaseOS Source - mirrors.aliyun.com
baseurl=https://mirrors.aliyun.com/centos-stream/9-stream/BaseOS/source/tree/
gpgcheck=1
gpgkey=file:///etc/pki/rpm-gpg/RPM-GPG-KEY-centosofficial
enabled=0
[appstream]
name=CentOS Stream $releasever - AppStream - mirrors.aliyun.com
baseurl=https://mirrors.aliyun.com/centos-stream/9-stream/AppStream/x86_64/os/
gpgcheck=1
gpgkey=file:///etc/pki/rpm-gpg/RPM-GPG-KEY-centosofficial
enabled=1
[appstream-debuginfo]
name=CentOS Stream $releasever - AppStream Debuginfo - mirrors.aliyun.com
baseurl=https://mirrors.aliyun.com/centos-stream/9-stream/AppStream/x86_64/debug/tree/
gpgcheck=1
gpgkey=file:///etc/pki/rpm-gpg/RPM-GPG-KEY-centosofficial
enabled=0
[appstream-source]
name=CentOS Stream $releasever - AppStream Source - mirrors.aliyun.com
baseurl=https://mirrors.aliyun.com/centos-stream/9-stream/AppStream/source/tree/
gpgcheck=1
gpgkey=file:///etc/pki/rpm-gpg/RPM-GPG-KEY-centosofficial
enabled=0
EOF
[root@localhost ~]# hostnamectl set-hostname master01
[root@master01 ~]# hostname
master01
[root@master02 ~]# hostname
master02
[root@master03 ~]# hostname
master03
[root@worker01 ~]# hostname
worker01
[root@worker02 ~]# hostname
worker02
[root@master01 ~]# nmcli connection modify "ens160" ipv4.method manual ipv4.addresses 192.168.213.41/24 ipv4.gateway 192.168.213.2 ipv4.dns "192.168.213.2"
[root@master01 ~]# nmcli connection up "ens160"
Connection successfully activated (D-Bus active path: /org/freedesktop/NetworkManager/ActiveConnection/3)
[root@master02 ~]# nmcli connection modify "ens160" ipv4.method manual ipv4.addresses 192.168.213.42/24 ipv4.gateway 192.168.213.2 ipv4.dns "192.168.213.2"
[root@master02 ~]# nmcli connection up "ens160"
Connection successfully activated (D-Bus active path: /org/freedesktop/NetworkManager/ActiveConnection/3)
[root@master03 ~]# nmcli connection modify "ens160" ipv4.method manual ipv4.addresses 192.168.213.43/24 ipv4.gateway 192.168.213.2 ipv4.dns "192.168.213.2"
[root@master03 ~]# nmcli connection up "ens160"
Connection successfully activated (D-Bus active path: /org/freedesktop/NetworkManager/ActiveConnection/3)
[root@worker01 ~]# nmcli connection modify "ens160" ipv4.method manual ipv4.addresses 192.168.213.44/24 ipv4.gateway 192.168.213.2 ipv4.dns "192.168.213.2"
[root@worker01 ~]# nmcli connection up "ens160"
Connection successfully activated (D-Bus active path: /org/freedesktop/NetworkManager/ActiveConnection/3)
[root@worker02 ~]# nmcli connection modify "ens160" ipv4.method manual ipv4.addresses 192.168.213.45/24 ipv4.gateway 192.168.213.2 ipv4.dns "192.168.213.2"
[root@worker02 ~]# nmcli connection up "ens160"
Connection successfully activated (D-Bus active path: /org/freedesktop/NetworkManager/ActiveConnection/3)
[root@master01 ~]# systemctl stop firewalld.service [root@master01 ~]# systemctl disable firewalld.service Removed "/etc/systemd/system/multi-user.target.wants/firewalld.service" . Removed "/etc/systemd/system/dbus-org.fedoraproject.FirewallD1.service" . [root@master01 ~]# setenforce 0 [root@master01 ~]# sed -i 's/^SELINUX=enforcing$/SELINUX=permissive/' /etc/selinux/config
[root@master01 ~]# sed -ri 's/.*swap.*/#&/' /etc/fstab
[root@master01 ~]# swapoff -a
[root@master01 ~]# yum install epel-release [root@master01 ~]# yum install nginx keepalived [root@master01 ~]# cp /etc/nginx/nginx.conf /etc/nginx/nginx.conf.bak [root@master01 ~]# yum install nginx-mod-stream [root@master01 ~]# cat /etc/nginx/nginx.conf user nginx; worker_processes auto; error_log /var/log/nginx/error.log; pid /run/nginx.pid; include /usr/share/nginx/modules/*.conf; events { worker_connections 1024; } stream { log_format main '$remote_addr $upstream_addr - [$time_local] $status $upstream_bytes_sent' ; access_log /var/log/nginx/k8s-access.log main; upstream k8s-apiserver { server 192.168.213.41:6443; server 192.168.213.42:6443; server 192.168.213.43:6443; } server { listen 16443; proxy_pass k8s-apiserver; } } http { log_format main '$remote_addr - $remote_user [$time_local] "$request" ' '$status $body_bytes_sent "$http_referer" ' '"$http_user_agent" "$http_x_forwarded_for"' ; access_log /var/log/nginx/access.log main; sendfile on; tcp_nopush on; tcp_nodelay on; keepalive_timeout 65; types_hash_max_size 4096; include /etc/nginx/mime.types; default_type application/octet-stream; include /etc/nginx/conf.d/*.conf; server { listen 80; listen [::]:80; server_name _; root /usr/share/nginx/html; include /etc/nginx/default.d/*.conf; error_page 404 /404.html; location = /404.html { } error_page 500 502 503 504 /50x.html; location = /50x.html { } } } [root@master01 ~]# nginx -t nginx: the configuration file /etc/nginx/nginx.conf syntax is ok nginx: configuration file /etc/nginx/nginx.conf test is successful [root@master01 ~]# cp /etc/keepalived/keepalived.conf /etc/keepalived/keepalived.conf.bak [root@master01 ~]# cat /etc/keepalived/keepalived.conf global_defs { notification_email { acassen@firewall.loc failover@firewall.loc sysadmin@firewall.loc } notification_email_from Alexandre.Cassen@firewall.loc smtp_server 127.0.0.1 smtp_connect_timeout 30 router_id NGINX_MASTER } vrrp_script check_nginx { script "/etc/keepalived/check_nginx.sh" } vrrp_instance VI_1 { state MASTER interface ens160 mcast_src_ip 192.168.213.41 virtual_router_id 51 priority 100 advert_int 1 authentication { auth_type PASS auth_pass 1111 } virtual_ipaddress { 192.168.213.40/24 } track_script { check_nginx } } [root@master01 ~]# cat /etc/keepalived/check_nginx.sh count=$(ps -ef |grep nginx | grep sbin | egrep -cv "grep|$$" ) if [ "$count " -eq 0 ];then systemctl stop keepalived fi [root@master01 ~]# chmod +x /etc/keepalived/check_nginx.sh [root@master01 ~]# systemctl daemon-reload && systemctl start nginx keepalived && systemctl enable nginx keepalived
[root@master02 ~]# yum install epel-release [root@master02 ~]# yum install nginx keepalived [root@master02 ~]# cp /etc/nginx/nginx.conf /etc/nginx/nginx.conf.bak [root@master02 ~]# yum install nginx-mod-stream [root@master02 ~]# cat /etc/nginx/nginx.conf user nginx; worker_processes auto; error_log /var/log/nginx/error.log; pid /run/nginx.pid; include /usr/share/nginx/modules/*.conf; events { worker_connections 1024; } stream { log_format main '$remote_addr $upstream_addr - [$time_local] $status $upstream_bytes_sent' ; access_log /var/log/nginx/k8s-access.log main; upstream k8s-apiserver { server 192.168.213.41:6443; server 192.168.213.42:6443; server 192.168.213.43:6443; } server { listen 16443; proxy_pass k8s-apiserver; } } http { log_format main '$remote_addr - $remote_user [$time_local] "$request" ' '$status $body_bytes_sent "$http_referer" ' '"$http_user_agent" "$http_x_forwarded_for"' ; access_log /var/log/nginx/access.log main; sendfile on; tcp_nopush on; tcp_nodelay on; keepalive_timeout 65; types_hash_max_size 4096; include /etc/nginx/mime.types; default_type application/octet-stream; include /etc/nginx/conf.d/*.conf; server { listen 80; listen [::]:80; server_name _; root /usr/share/nginx/html; include /etc/nginx/default.d/*.conf; error_page 404 /404.html; location = /404.html { } error_page 500 502 503 504 /50x.html; location = /50x.html { } } } [root@master02 ~]# nginx -t nginx: the configuration file /etc/nginx/nginx.conf syntax is ok nginx: configuration file /etc/nginx/nginx.conf test is successful [root@master02 ~]# cp /etc/keepalived/keepalived.conf /etc/keepalived/keepalived.conf.bak [root@master02 ~]# cat /etc/keepalived/keepalived.conf global_defs { notification_email { acassen@firewall.loc failover@firewall.loc sysadmin@firewall.loc } notification_email_from Alexandre.Cassen@firewall.loc smtp_server 127.0.0.1 smtp_connect_timeout 30 router_id NGINX_BACKUP } vrrp_script check_nginx { script "/etc/keepalived/check_nginx.sh" } vrrp_instance VI_1 { state BACKUP interface ens160 mcast_src_ip 192.168.213.42 virtual_router_id 51 priority 99 advert_int 1 authentication { auth_type PASS auth_pass 1111 } virtual_ipaddress { 192.168.213.40/24 } track_script { check_nginx } } [root@master02 ~]# cat /etc/keepalived/check_nginx.sh count=$(ps -ef |grep nginx | grep sbin | egrep -cv "grep|$$" ) if [ "$count " -eq 0 ];then systemctl stop keepalived fi [root@master02 ~]# chmod +x /etc/keepalived/check_nginx.sh [root@master02 ~]# systemctl daemon-reload && systemctl start nginx keepalived && systemctl enable nginx keepalived
[root@master03 ~]# yum install epel-release [root@master03 ~]# yum install nginx keepalived [root@master03 ~]# cp /etc/nginx/nginx.conf /etc/nginx/nginx.conf.bak [root@master03 ~]# yum install nginx-mod-stream [root@master03 ~]# cat /etc/nginx/nginx.conf user nginx; worker_processes auto; error_log /var/log/nginx/error.log; pid /run/nginx.pid; include /usr/share/nginx/modules/*.conf; events { worker_connections 1024; } stream { log_format main '$remote_addr $upstream_addr - [$time_local] $status $upstream_bytes_sent' ; access_log /var/log/nginx/k8s-access.log main; upstream k8s-apiserver { server 192.168.213.41:6443; server 192.168.213.42:6443; server 192.168.213.43:6443; } server { listen 16443; proxy_pass k8s-apiserver; } } http { log_format main '$remote_addr - $remote_user [$time_local] "$request" ' '$status $body_bytes_sent "$http_referer" ' '"$http_user_agent" "$http_x_forwarded_for"' ; access_log /var/log/nginx/access.log main; sendfile on; tcp_nopush on; tcp_nodelay on; keepalive_timeout 65; types_hash_max_size 4096; include /etc/nginx/mime.types; default_type application/octet-stream; include /etc/nginx/conf.d/*.conf; server { listen 80; listen [::]:80; server_name _; root /usr/share/nginx/html; include /etc/nginx/default.d/*.conf; error_page 404 /404.html; location = /404.html { } error_page 500 502 503 504 /50x.html; location = /50x.html { } } } [root@master03 ~]# nginx -t nginx: the configuration file /etc/nginx/nginx.conf syntax is ok nginx: configuration file /etc/nginx/nginx.conf test is successful [root@master03 ~]# cp /etc/keepalived/keepalived.conf /etc/keepalived/keepalived.conf.bak [root@master03 ~]# cat /etc/keepalived/keepalived.conf global_defs { notification_email { acassen@firewall.loc failover@firewall.loc sysadmin@firewall.loc } notification_email_from Alexandre.Cassen@firewall.loc smtp_server 127.0.0.1 smtp_connect_timeout 30 router_id NGINX_BACKUP } vrrp_script check_nginx { script "/etc/keepalived/check_nginx.sh" } vrrp_instance VI_1 { state BACKUP interface ens160 mcast_src_ip 192.168.213.43 virtual_router_id 51 priority 98 advert_int 1 authentication { auth_type PASS auth_pass 1111 } virtual_ipaddress { 192.168.213.40/24 } track_script { check_nginx } } [root@master03 ~]# cat /etc/keepalived/check_nginx.sh count=$(ps -ef |grep nginx | grep sbin | egrep -cv "grep|$$" ) if [ "$count " -eq 0 ];then systemctl stop keepalived fi [root@master03 ~]# chmod +x /etc/keepalived/check_nginx.sh [root@master03 ~]# systemctl daemon-reload && systemctl start nginx keepalived && systemctl enable nginx keepalived
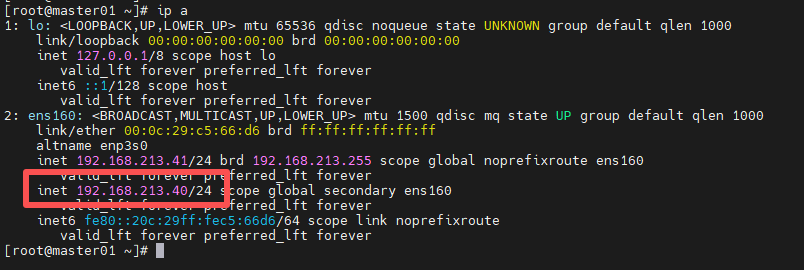
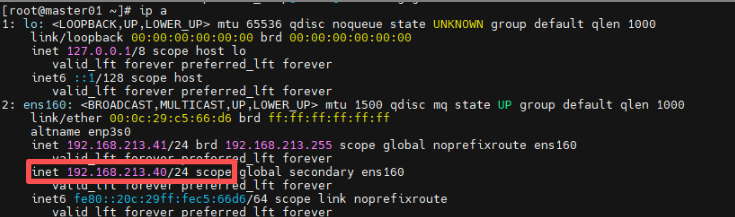
三个master节点配置完成后,查看vip情况
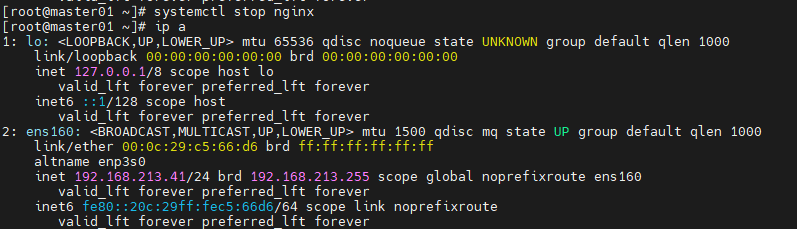
稍微通过stop掉nginx节点服务来验证是否继续提供服务
[root@master01 ~]# systemctl stop nginx
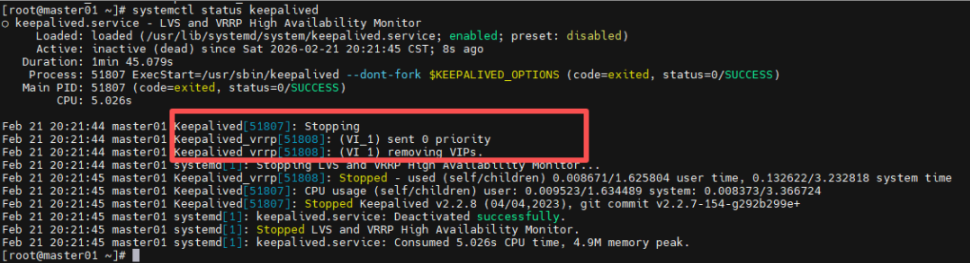
可以看见vip已经飘走,而且keepalived服务也已经挂掉:
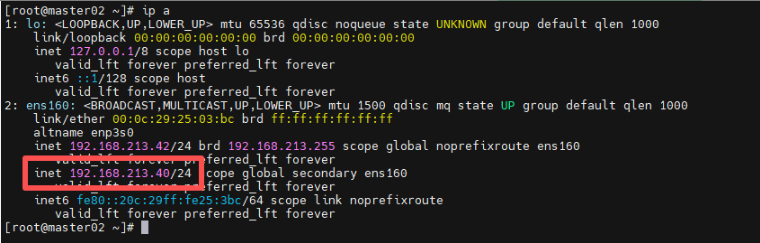
可以在master02节点发现vip:
当在master01节点上,启动nginx、keepalived服务后:
[root@master01 ~]# systemctl start nginx
[root@master01 ~]# systemctl start keepalived
vip已经飘回到master01节点了:
[root@master01 ~]# cat /etc/hosts
127.0.0.1   localhost localhost.localdomain localhost4 localhost4.localdomain4
::1         localhost localhost.localdomain localhost6 localhost6.localdomain6

192.168.213.41  master01
192.168.213.42  master02
192.168.213.43  master03
192.168.213.44  worker01
192.168.213.45  worker02
[root@master01 ~]# dnf install kernel-devel-$(uname -r)
[root@master01 ~]# modprobe br_netfilter
[root@master01 ~]# modprobe ip_vs
[root@master01 ~]# modprobe ip_vs_rr
[root@master01 ~]# modprobe ip_vs_wrr
[root@master01 ~]# modprobe ip_vs_sh
[root@master01 ~]# modprobe overlay
上面作用:加载kubernetes正常运行所必需的内核模块,通过加载这些模块,您可以确保服务器已为 Kubernetes 安装做好准备,并能有效地管理集群内的网络和负载均衡任务
[root@master01 ~]# cat > /etc/modules-load.d/kubernetes.conf << EOF
br_netfilter
ip_vs
ip_vs_rr
ip_vs_wrr
ip_vs_sh
overlay
EOF
这里是为了这些模块在系统启动时进行加载
[root@master01 ~]# cat > /etc/sysctl.d/kubernetes.conf << EOF
net.ipv4.ip_forward = 1
net.bridge.bridge-nf-call-ip6tables = 1
net.bridge.bridge-nf-call-iptables = 1
EOF
net.bridge.bridge-nf-call-ip6tables:使iptables能够处理桥接的 IPv6 流量
net.bridge.bridge-nf-call-iptables:使 iptables 能够处理桥接的 IPv4 流量
net.ipv4.ip_forward:启用IPv4数据包转发
通过设置这些sysctl参数,可以确保系统配置正确,以支持 Kubernetes 网络需求以及集群内部的网络流量转发。这些设置对于 Kubernetes 网络组件的平稳运行至关重要
[root@master01 ~]# sysctl --system
以上就是k8s节点系统中相关的初始化配置,接下来就是其他的配置
[root@master01 ~]# cd /etc/yum.repos.d/ && wget https://mirrors.aliyun.com/docker-ce/linux/centos/docker-ce.repo
[root@master01 yum.repos.d]# cd
[root@master01 ~]# yum install docker-ce -y
[root@master01 ~]# systemctl start docker
[root@master01 ~]# systemctl enable docker
[root@master01 ~]# cat << EOF > /etc/docker/daemon.json
{
    "registry-mirrors": [
     "https://docker.1ms.run",
     "https://docker.aityp.com",
     "https://docker.m.daocloud.io"
     ]
}
EOF
[root@master01 ~]# systemctl daemon-reload
[root@master01 ~]# systemctl restart docker
[root@master01 ~]# wget https://github.com/Mirantis/cri-dockerd/releases/download/v0.3.16/cri-dockerd-0.3.16.amd64.tgz [root@master01 ~]# tar xf cri-dockerd-0.3.16.amd64.tgz [root@master01 ~]# cp cri-dockerd/cri-dockerd /usr/bin/ [root@master01 ~]# cat /etc/systemd/system/cri-docker.service [Unit] Description=CRI Interface for Docker Application Container Engine Documentation=https://docs.mirantis.com After=network-online.target firewalld.service docker.service Wants=network-online.target Requires=cri-docker.socket [Service] Type=notify ExecStart=/usr/bin/cri-dockerd --container-runtime-endpoint fd:// ExecReload=/bin/kill -s HUP $MAINPID TimeoutSec=0 RestartSec=2 Restart=always StartLimitBurst=3 StartLimitInterval=60s LimitNOFILE=infinity LimitNPROC=infinity LimitCORE=infinity TasksMax=infinity Delegate=yes KillMode=process [Install] WantedBy=multi-user.target [root@master01 ~]# cat /etc/systemd/system/cri-docker.socket [Unit] Description=CRI Docker Socket for the API PartOf=cri-docker.service [Socket] ListenStream=%t/cri-dockerd.sock SocketMode=0660 SocketUser=root SocketGroup=docker [Install] WantedBy=sockets.target [root@master01 ~]# systemctl enable cri-docker --now Created symlink /etc/systemd/system/multi-user.target.wants/cri-docker.service → /etc/systemd/system/cri-docker.service. [root@master01 ~]# systemctl enable cri-docker.socket --now Created symlink /etc/systemd/system/sockets.target.wants/cri-docker.socket → /etc/systemd/system/cri-docker.socket. [root@master01 ~]# systemctl status cri-docker
[root@master01 ~]# cat << EOF > /etc/yum.repos.d/kubernetes.repo
[kubernetes]
name=Kubernetes
baseurl=https://mirrors.aliyun.com/kubernetes-new/core/stable/v1.35/rpm/
enabled=1
gpgcheck=1
gpgkey=https://mirrors.aliyun.com/kubernetes-new/core/stable/v1.35/rpm/repodata/repomd.xml.key
exclude=kubelet kubeadm kubectl cri-tools kubernetes-cni
EOF
[root@master01 ~]# yum install -y kubelet kubeadm kubectl --disableexcludes=kubernetes
启用kubelet服务(所有节点)
[root@master01 ~]# systemctl enable --now kubelet.service
等到上面所有相关配置完成无误后,接下来就是k8s集群初始化阶段
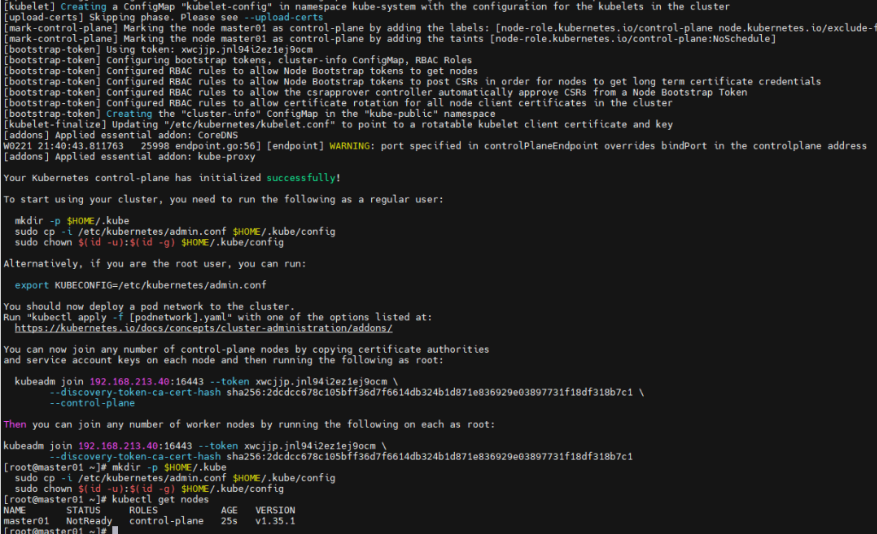
[root@master01 ~]# kubeadm init --apiserver-advertise-address=192.168.213.40 --control-plane-endpoint 192.168.213.40:16443 --image-repository registry.aliyuncs.com/google_containers --service-cidr=10.96.0.0/16 --pod-network-cidr=10.244.0.0/16 --cri-socket unix:///var/run/cri-dockerd.sock
其中192.168.213.40是上面配置的vip,16443端口是nginx那里配置的监听端口
正常初始化无误如上图,接下来初始化其他mster节点
[root@master02 ~]# mkdir /etc/kubernetes/pki
[root@master02 ~]# mkdir /etc/kubernetes/pki/etcd/
[root@master01 ~]# scp /etc/kubernetes/pki/ca.* master02:/etc/kubernetes/pki/
[root@master01 ~]# scp /etc/kubernetes/pki/sa.* master02:/etc/kubernetes/pki/
[root@master01 ~]# scp /etc/kubernetes/pki/front-proxy-c* master02:/etc/kubernetes/pki/
[root@master01 ~]# scp /etc/kubernetes/pki/etcd/ca.* master02:/etc/kubernetes/pki/etcd/
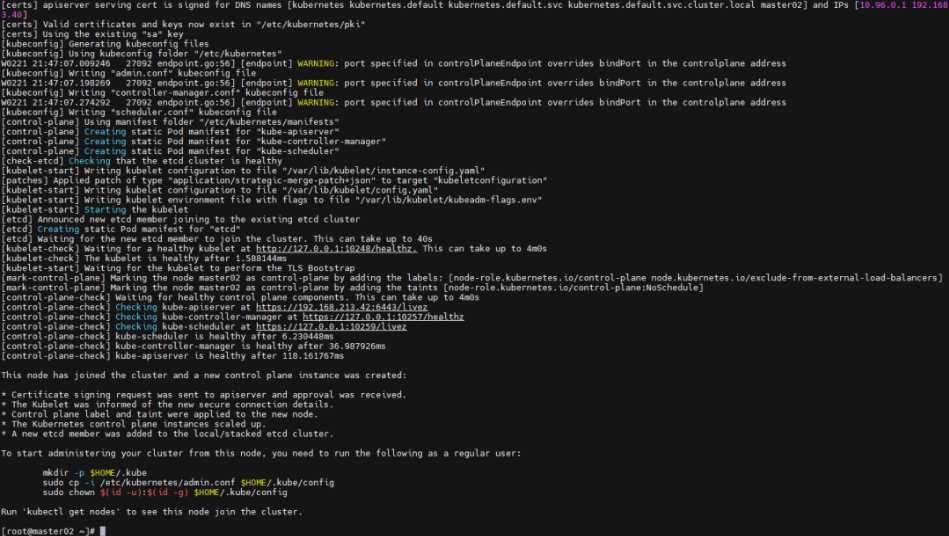
完成这个同步后,接下来在master02节点上进行初始化
[root@master02 ~]# kubeadm join 192.168.213.40:16443 --token xwcjjp.jnl94i2ez1ej9ocm --discovery-token-ca-cert-hash sha256:2dcdcc678c105bff36d7f6614db324b1d871e836929e03897731f18df318b7c1 --control-plane --cri-socket unix:///var/run/cri-dockerd.sock
成功初始化如上
[root@master01 ~]# kubectl get nodes
NAME       STATUS     ROLES           AGE     VERSION
master01   NotReady   control-plane   8m17s   v1.35.1
master02   NotReady   control-plane   64s     v1.35.1
接下来master03按照相同方式进行同步证书并初始化
[root@master03 ~]# mkdir /etc/kubernetes/pki
[root@master03 ~]# mkdir /etc/kubernetes/pki/etcd/
[root@master01 ~]# scp /etc/kubernetes/pki/ca.* master03:/etc/kubernetes/pki/
[root@master01 ~]# scp /etc/kubernetes/pki/sa.* master03:/etc/kubernetes/pki/
[root@master01 ~]# scp /etc/kubernetes/pki/etcd/ca.* master03:/etc/kubernetes/pki/etcd/
[root@master01 ~]# scp /etc/kubernetes/pki/front-proxy-c* master03:/etc/kubernetes/pki/

[root@master03 ~]# kubeadm join 192.168.213.40:16443 --token xwcjjp.jnl94i2ez1ej9ocm --discovery-token-ca-cert-hash sha256:2dcdcc678c105bff36d7f6614db324b1d871e836929e03897731f18df318b7c1 --control-plane --cri-socket unix:///var/run/cri-dockerd.sock
当master所有节点都初始化完成后,然后添加worker节点:
[root@worker01 ~]# kubeadm join 192.168.213.40:16443 --token xwcjjp.jnl94i2ez1ej9ocm --discovery-token-ca-cert-hash sha256:2dcdcc678c105bff36d7f6614db324b1d871e836929e03897731f18df318b7c1 --cri-socket unix:///var/run/cri-dockerd.sock
[root@worker02 ~]# kubeadm join 192.168.213.40:16443 --token xwcjjp.jnl94i2ez1ej9ocm --discovery-token-ca-cert-hash sha256:2dcdcc678c105bff36d7f6614db324b1d871e836929e03897731f18df318b7c1 --cri-socket unix:///var/run/cri-dockerd.sock
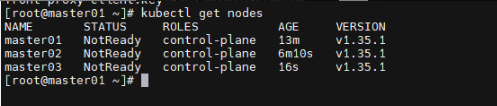
添加worker两台节点后,集群状态如下
[root@master01 ~]# kubectl get nodes
NAME       STATUS     ROLES           AGE     VERSION
master01   NotReady   control-plane   15m     v1.35.1
master02   NotReady   control-plane   8m46s   v1.35.1
master03   NotReady   control-plane   2m52s   v1.35.1
worker01   NotReady   <none>          63s     v1.35.1
worker02   NotReady   <none>          54s     v1.35.1
接下来安装网络插件calico,实现集群中各个 Pod 之间的联网,为 Calico 部署 Tigera Operator
[root@master01 ~]# wget https://raw.githubusercontent.com/projectcalico/calico/v3.26.1/manifests/tigera-operator.yaml
部署如下:
[root@master01 ~]# kubectl create -f tigera-operator.yaml
namespace/tigera-operator created
customresourcedefinition.apiextensions.k8s.io/bgpconfigurations.crd.projectcalico.org created
customresourcedefinition.apiextensions.k8s.io/bgpfilters.crd.projectcalico.org created
customresourcedefinition.apiextensions.k8s.io/bgppeers.crd.projectcalico.org created
customresourcedefinition.apiextensions.k8s.io/blockaffinities.crd.projectcalico.org created
customresourcedefinition.apiextensions.k8s.io/caliconodestatuses.crd.projectcalico.org created
customresourcedefinition.apiextensions.k8s.io/clusterinformations.crd.projectcalico.org created
customresourcedefinition.apiextensions.k8s.io/felixconfigurations.crd.projectcalico.org created
customresourcedefinition.apiextensions.k8s.io/globalnetworkpolicies.crd.projectcalico.org created
customresourcedefinition.apiextensions.k8s.io/globalnetworksets.crd.projectcalico.org created
customresourcedefinition.apiextensions.k8s.io/hostendpoints.crd.projectcalico.org created
customresourcedefinition.apiextensions.k8s.io/ipamblocks.crd.projectcalico.org created
customresourcedefinition.apiextensions.k8s.io/ipamconfigs.crd.projectcalico.org created
customresourcedefinition.apiextensions.k8s.io/ipamhandles.crd.projectcalico.org created
customresourcedefinition.apiextensions.k8s.io/ippools.crd.projectcalico.org created
customresourcedefinition.apiextensions.k8s.io/ipreservations.crd.projectcalico.org created
customresourcedefinition.apiextensions.k8s.io/kubecontrollersconfigurations.crd.projectcalico.org created
customresourcedefinition.apiextensions.k8s.io/networkpolicies.crd.projectcalico.org created
customresourcedefinition.apiextensions.k8s.io/networksets.crd.projectcalico.org created
customresourcedefinition.apiextensions.k8s.io/apiservers.operator.tigera.io created
customresourcedefinition.apiextensions.k8s.io/imagesets.operator.tigera.io created
customresourcedefinition.apiextensions.k8s.io/installations.operator.tigera.io created
customresourcedefinition.apiextensions.k8s.io/tigerastatuses.operator.tigera.io created
serviceaccount/tigera-operator created
clusterrole.rbac.authorization.k8s.io/tigera-operator created
clusterrolebinding.rbac.authorization.k8s.io/tigera-operator created
deployment.apps/tigera-operator created
下载calico自定义资源清单
[root@master01 ~]# wget https://raw.githubusercontent.com/projectcalico/calico/v3.26.1/manifests/custom-resources.yaml
[root@master01 ~]# sed -i 's/cidr: 192\.168\.0\.0\/16/cidr: 10.244.0.0\/16/g' custom-resources.yaml
[root@master01 ~]# kubectl create -f custom-resources.yaml
installation.operator.tigera.io/default created
apiserver.operator.tigera.io/default created
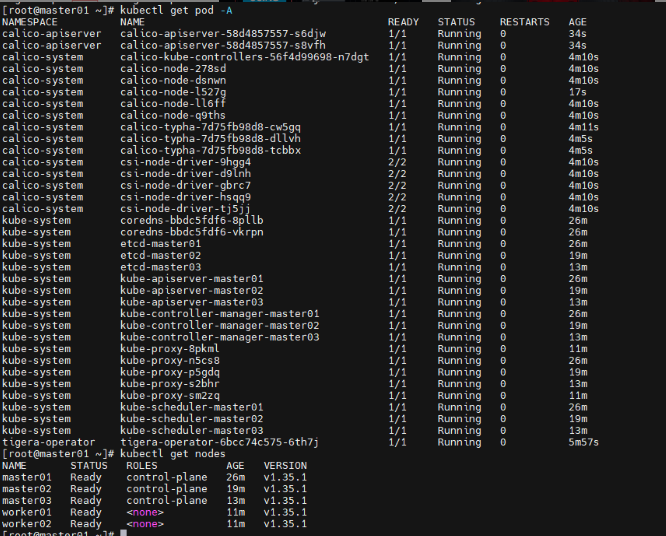
完成上面配置后,查看pod状态
至此高可用k8s集群1.35版本安装完成
[root@master01 ~]# kubectl cluster-info Kubernetes control plane is running at https://192.168.213.40:16443 CoreDNS is running at https://192.168.213.40:16443/api/v1/namespaces/kube-system/services/kube-dns:dns/proxy To further debug and diagnose cluster problems, use 'kubectl cluster-info dump' .
简单创建一个nginx应用实例
[root@master01 ~]# cat > nginx-deploy.yaml << 'EOF'
apiVersion: apps/v1
kind: Deployment
metadata:
  name: nginx-deployment
  labels:
    app: nginx
spec:
  replicas: 1
  selector:
    matchLabels:
      app: nginx
  template:
    metadata:
      labels:
        app: nginx
    spec:
      containers:
      - name: nginx
        image: nginx:latest
        ports:
        - containerPort: 80
EOF
[root@master01 ~]# kubectl create -f nginx-deploy.yaml
deployment.apps/nginx-deployment created
[root@master01 ~]# kubectl get pod
NAME                                READY   STATUS    RESTARTS   AGE
nginx-deployment-59f86b59ff-dhr7t   1/1     Running   0          31s
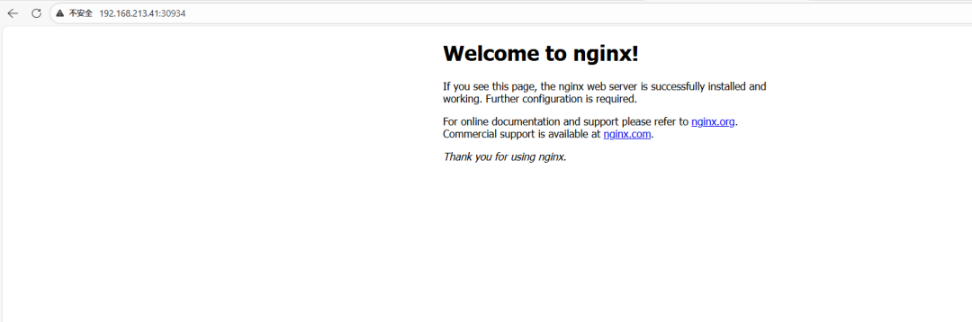
将部署的nginx应用暴露给外部网络
[root@master01 ~]# cat > nginx-svc.yaml << 'EOF' apiVersion: v1 kind: Service metadata: name: nginx-service spec: selector: app: nginx ports: - protocol: TCP port: 80 targetPort: 80 type : NodePort EOF
[root@master01 ~]# kubectl apply -f nginx-svc.yaml
service/nginx-service created
查看暴露的外部端口
[root@master01 ~]# kubectl get svc|grep nginx
nginx-service   NodePort    10.96.9.115   <none>        80:30934/TCP   36s
浏览器进行访问验证


 微信 WeChat
 支付宝 Alipay